Sony Vegas is a video editing and processing application designed to produce professional grade high-quality videos in a convenient manner.
Since it is a commercial application in nature, it is shipped with high-quality codecs, a professional grade rendering engine, and a highly optimized video editor. Occasionally, due to the flaws in either the computer system where the software is installed or the software configuration result in abnormal behavior or lags while it’s being used. So we’re prepared this little guide to help you address such issues amicably.
Cleaning up system junk is a very effective tip, to guard against all kinds of software apps lagging or ‘acting up’. You’ll be surprised by the amount of junk data that is unearthed and subsequently gotten rid of, by a scan that takes only a few minutes at max!
Perform Extensive System Cleaning to fix lags in Sony Vegas
ST Cleaner adheres to Clean Software Association Guidelines
Solutions
Solution 1: Adjust the Dynamic RAM
This is somewhat a tricky option, as increasing the Dynamic RAM will result in less RAM than before being available for the system’s needs. On the other hand, decreasing it will result in Sony Vegas experiencing lags, especially when a mechanical hard drive is being used instead of a SSD drive. It’s recommended to keep the Dynamic RAM somewhere in the middle in order to allocate sufficient RAM for both the system as well as any software program that is highly dependent on it (Sony Vegas in this case). Having said that, it’s important for a video editing machine to have at least 4GB RAM, especially if the operating system is prone to consume a large amount of RAM. This solution is mostly useful for those users who possess computer systems that meet the minimum 4GB of RAM criteria. In any other scenario, please consider upgrading the RAM before proceeding ahead.
- Launch the Sony Vegas software.
- Locate Options in the menu bar and click it.

Open up Options - Move the cursor downwards until you find Preferences, open it.

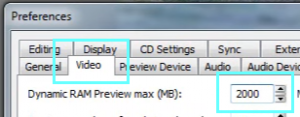
- Switch to the Video tab. Now adjust the Dynamic RAM Preview max (MB) to a more strong number. For instance, if the system is equipped with 8GB RAM, then it’s better to keep the Dynamic RAM Preview to 2000MB (roughly 2GB), if the system has 4GB RAM, keep it under 500MB.

- If Sony Vegas’s Preferences menu fails to bring up the installed system memory value, open System Information through the start menu. Next, locate Installed Physical Memory (RAM) in the right pane of the window.


Finding out the installed RAM in the system
Solution 2: Disable Media Manager in Sony Vegas
Enabling this option causes Sony Vegas to store all the personal user information related to the application in a database, thereby resulting in overutilization of the hard drive which leads to lags when the hard drive is a mechanical one rather than an SSD one. So it’s recommended to turn it off in that case.
- Open up the Sony Vegas program.
- Locate Options in the menu bar, and click to open it.

- Locate Preferences, and open it.

Click on Preferences - Now switch to the General tab.

- Turn off Media Manager by deselecting the Enable Media Manager option. Restart the application for the changes to be fully effective.

Solution 3: Turn On the GPU Accelerator
Sony Vegas in default utilizes the CPU for all the rendering tasks, previewing etc, and for this reason, it often takes a while to produce the final output video. However, when the workload is shifted to the GPU, which is specially designed to process graphical elements like videos/images/vector graphics, there can be a significant improvement in the performance. So turn it on when a good graphics adapter is available in the system. But make sure the graphics driver is installed prior to use this option.
- Go to the graphics adapter’s manufacturer (Nvidia or AMD) and download the driver. Make sure to make use of the automatically detecting tool available on these sites to make the whole process automated more accurate and swift.
Nvidia: http://www.nvidia.com/Download/index.aspx
AMD: http://support.amd.com/en-us/download - Now launch the Sony Vegas software program.
- Locate Options in the menu bar, and click it.

Select Options - Move the cursor downwards, locate and click on Preferences.

- Switch to the Video tab.

Click the Video tab - Turn on GPU accelerator by selecting the available graphics adapter from the GPU acceleration of video processing drop-down menu.

Selecting the graphics adapter from the drop-down menu
